Wanna see something cool? Check out Angular Spotify 🎧
Migrate Angular to ESLint
TSLint is deprecated
TSLint has been a default configuration for linting with Angular CLI for a long time, until its author decided to deprecated TSLint. If you run npm run lint in your project that was created with CLI, you will get the below warning.

As suggested in the warning message, head over to angular-eslint, and we will prepare to migrate away from TSLint.
Migrate to angular-eslint
I will use this opportunity to migrate angular-tetris to Angular 11 and angular-eslint
Prerequisite
angular-eslint support Angular CLI 10.1.0 and onwards, including Angular CLI 11.x.
So that, make sure that you update your Angular CLI first before going ahead. Suppose you install @angular/cli globally. Please run the following command to update its version.
npm i @angular/cliIf you have @angular/cli as the devDependencies, you can run.
npx ng update @angular/cliTo perform update both the CLI and all of @angular related packages, you can run.
npx ng update @angular/cli @angular/coreStep 1: Add relevant dependencies
The first step is to run the schematic to add @angular-eslint to your project:
npx ng add @angular-eslint/schematicsThis command adds the needed dependencies for angular-eslint, which looks like the below screenshot.

Step 2: Run the convert-tslint-to-eslint schematic on a project
The next thing to do is consider which “project” you want to migrate to use ESLint. If you have a single application in your workspace, you will likely have just a single entry in the projects configuration object within your angular.json file. If you have a projects/ directory in your workspace, you will have multiple entries in your projects configuration, and you will need to chose which one you want to migrate using the convert-tslint-to-eslint schematic.
In my use case, I only have a single application - angular-tetris

I will run the following command to migrate to ESLint.
npx ng g @angular-eslint/schematics:convert-tslint-to-eslint angular-tetrisIt will do two things.
- Update
angular.jsonto replacetslintwithangular-eslintfor linting configuration.

- Create a
.eslintrc.jsonfile based on yourtslint.jsonfile
The content of the file will be similar to a sample configuration here
I recommended you to read the full Notes on ESLint Configuration

Now, if you run npx ng lint, it will use ESLint under the hood.
⚠️ I faced a strange error when running this command on another project
Invalid rule result: Instance of class Promise

I look it up on google but all of the reported issues were related to @angular/devkit version and stuff, which didn’t fix mine.
I ended up doing two manual steps, as explained above:
- Update
angular.jsonto replacetslintwithangular-eslintfor linting configuration. You can copy from this code - And created a
.eslintrc.json, and filled in content from what I already have for angular-tetris .eslintrc
Step 3: Remove tslint and codelyzer from package.json
You could either do it manually by removing those from package.json, but remember to run another npm i to update your package-lock.json.
Or you could run npm uninstall -S tslint codelyzer for that purpose.
And then manually delete tslint.json

Fix all the lint errors in Angular Tetris
After having eslint set up, I run npm run lint and get many errors.

I added one more command on package.json to automatically fix problems if possible.
"lint:fix": "ng lint --fix",After cleaning all of the errors, that’s how it looks.

Setup husky and pre-commit hooks
Having lint setup is useless if you have to run it manually every time before you make a commit. Because most of the time, we will forget about running lint part. 😂 Pre-commit checks are commonly used to run linting scripts and tests, allowing each commit to be as clean as possible.
If we only setup lint to run on CI, developers allow to put not very clean code to our branch. Imagine a CI process take 15 minutes to run and when a developer push a commit, and move on to another task. If he realizes the CI has been failed after 10 minutes, he has to switch back to the other branch and fix the code, reducing productivity. We should set up lint on both pre-commit hook and CI.
And you should never use --no-verify to skip the lint process locally.
Husky
Husky make git hooks easy. It can prevent bad git commit, git push and more
Install husky by running
npm i -D huskyAnd then modify the package.json to looks like below.

npm run lint will always run when I try to commit a code.
Test husky
I defined a variable that doesn’t satisfy camelCase or UPPER_CASE, Test_Var. When trying to commit the code, husky prevents me from committing because lint doesn’t pass.
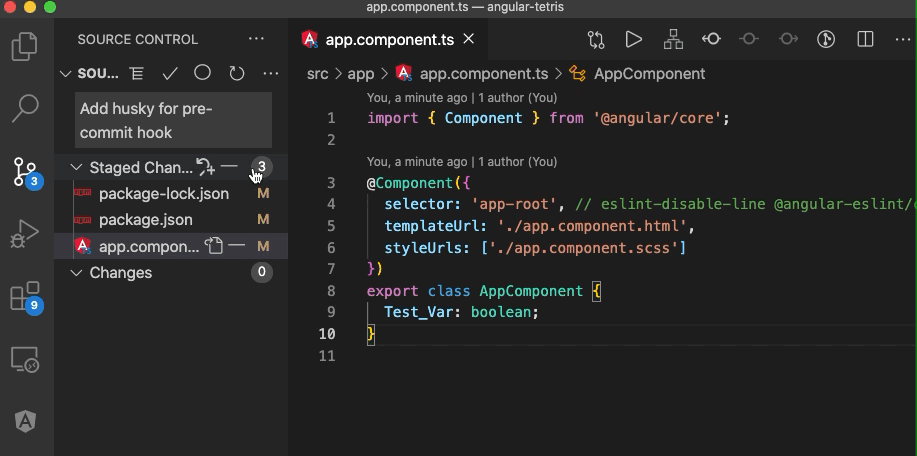
Works great.
Takeaways
- Migrate from TSLint to ESLint is simple with @angular-eslint.
- Set up a pre-commit hook to catch lint errors early and keep the code base clean.
Homework
Notice that npm run lint will lint all the files in our application, which we only want to run on CI. We want to run lint only on modified files or on staged files for local development. It will enhance the development experience a lot more. It would be best if you considered doing some research about it. Let me know in the comment what is your solution :)
Source code
Published 23 Jan 2021